Performing Remote Operation Using the HTTP Server
This section describes how to use the instrument’s HTTP server function to control it remotely using a computer.
You can configure the instrument’s settings, acquire measurement data, and monitor the display through a commonly used web browser, including Microsoft Edge.
To perform remote measurement using the HTTP server function, you must configure LAN settings and use a LAN connection.
When accessing the HTTP server, the communication command setting header will be set to OFF. You cannot perform the remote operation through the HTTP server during measurement using the Logger Utility or programs, including those created with Visual Basic.
Some browsers may be unable to connect to the HTTP server if the HTTP authentication setting is enabled. In this case, either use a different browser or disable the HTTP authentication setting.
After updating the instrument’s firmware, the remote operation function may open the page from the previous version or otherwise fail to function properly. In this case, delete your browser’s cache and connect again.
If you attempt to set the time during HTTP-server-communications, the communications may be disrupted.
Connecting to the HTTP server
This section describes how to connect to the HTTP server using a computer.
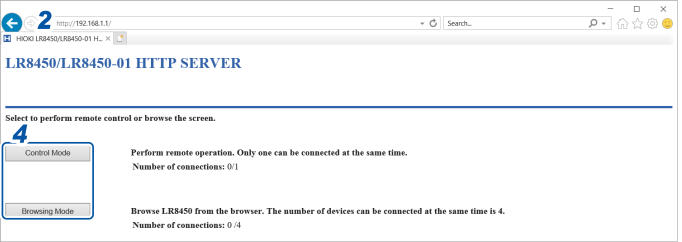
Enter the instrument’s address into the address bar (for example,  ).
).
Enter the username and password to log in.
To prevent inadvertent operation of the HTTP function by other users, it is recommended to set a username and password on the instrument to restrict access.
It is recommended to use Microsoft Edge.
|
|
Allows you to control and configure the instrument from a browser. Only one connection is supported. |
|---|---|
|
|
You can view the instrument’s screen and information about its status from a browser. Up to four simultaneous connections are supported. |
If nothing appears on the HTTP screen
After following the procedure below, check whether the computer can communicate with the instrument over the LAN connection.
“Troubleshooting LAN connections” in “9.3 Configuring and Establishing a LAN Connection” in the Instruction Manual.
Windows 10 and Windows 11
Remote control using a browser
This section describes how to display the instrument’s screen in a browser.
You can control the instrument remotely by clicking keys shown in the browser. However, power key operation and attempts to engage the key lock (pressing and holding the key) are ignored.
The mouse connected to the instrument cannot be used while it is being controlled remotely. By holding down the control key and clicking the right button, you can perform the same operation as a right click when a mouse is connected to the instrument.
Enter the instrument’s address into the address bar (for example, ).
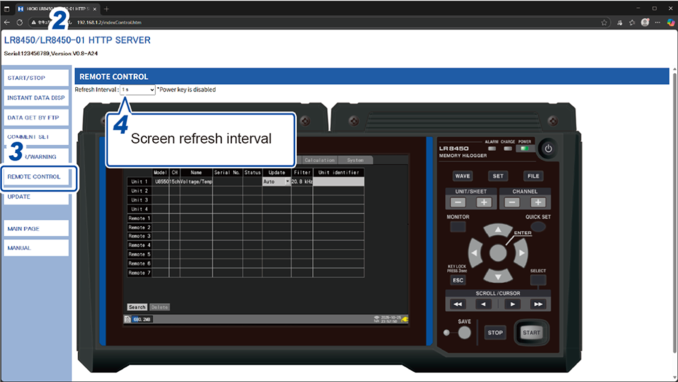
The instrument screen will be displayed. The keys provided by the instrument will be shown on the screen.
Click settings on the screen to control the instrument.
You can click the keys for operation.
The power key is disabled.
, , ,
When is set to 250 ms, the image quality will be degraded to keep up with the screen refreshment.
Instead of updating the screen, the instrument will display the message while being busy, such as performing a search, making numerical calculations, loading files, or saving files.
Starting and stopping measurement
This section describes how to start and stop measurement from a browser.
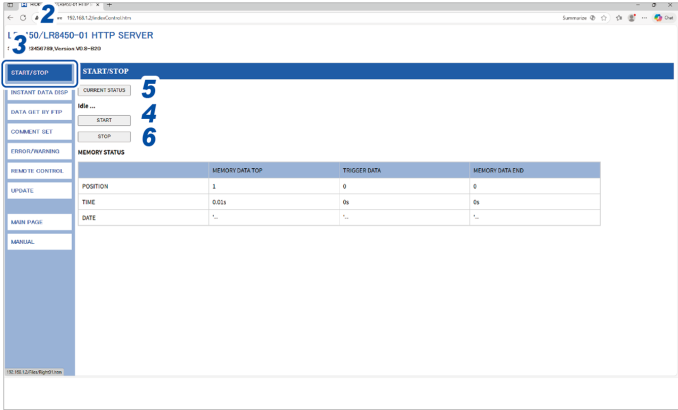
Enter the instrument’s address into the address bar (for example, ).
The screen will be displayed.
Measurement will start.
The status of measurement on the instrument will be displayed.
Measurement will stop.
Displaying measured values
You can check current measured values in a browser.
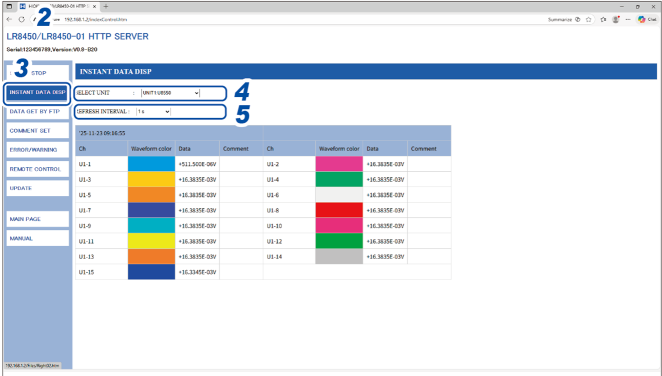
Enter the instrument’s address into the address bar (for example, ).
Current measured values will be displayed.
Measured values for each of the selected unit’s channels will be displayed.
-
Depending on communications conditions, it may take 2 to 3 s to acquire data.
-
Values are not shown for channels whose display has been disabled.
-
When measurement is stopped, the instantaneous data being input to each channel will be displayed.
☑, , , ,
Entering comments
This section describes how to enter title and channel comments from a browser.
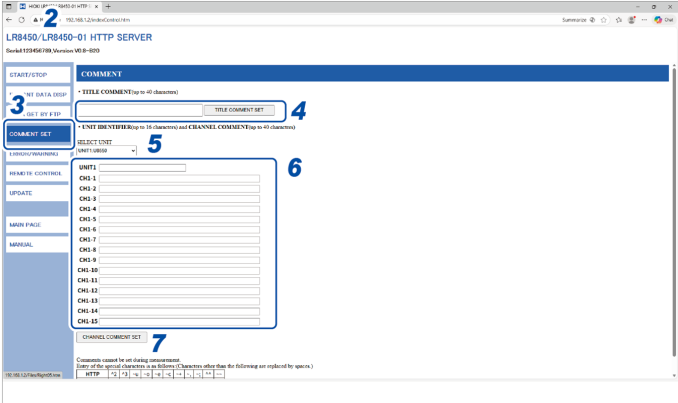
Enter the instrument’s address into the address bar (for example, ).
Entered comments will be applied to the instrument.
The title comment entered in the browser will be applied to the instrument.
The module identifier and the channel comments for the selected module will be displayed.
The module identifier and the channel comments will be applied to the instrument.
-
The instrument’s comments cannot be changed while measurement is in progress.
-
ASCII characters will be displayed properly on the instrument. Other characters may not be displayed properly on the instrument.
Error/warning display
You can use a browser to check the errors, warnings, and security logs.
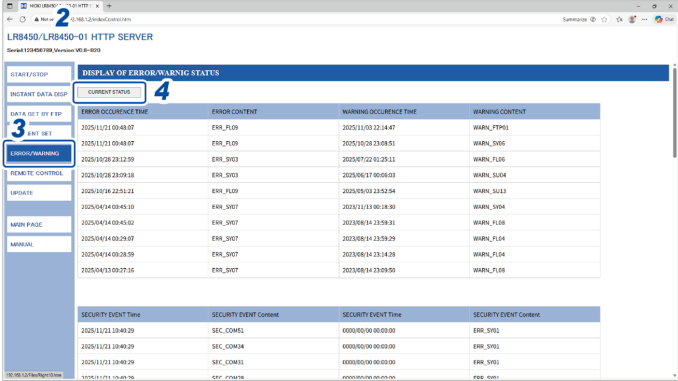
Enter the instrument’s address into the address bar (for example, ).
The displayed error and warning information and security event log is updated.
| Display | Description |
|---|---|
|
|
10 latest error logs |
|
|
10 latest warning logs |
|
|
100 latest security event logs |
Remote version update
You can update the instrument and modules through a web browser.
When the instrument and modules need to be updated, Hioki will release the updating files and version update procedure on the company’s website.
To update the instrument and modules remotely, download a compressed folder from the website and extract it in advance.
Neither an SD Memory Card nor a USB Drive is required.
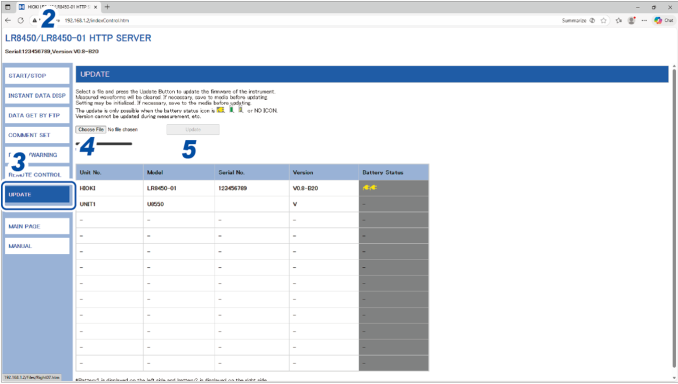
Enter the instrument’s address into the address bar (for example, ).
Executing the update of the instrument will automatically perform a restart, interrupting communications.
For more information about cautions and an after-update checklist, see the procedure.
Instruction manual
This section describes how to browse the instruction manual (this document, pdf) on a browser.
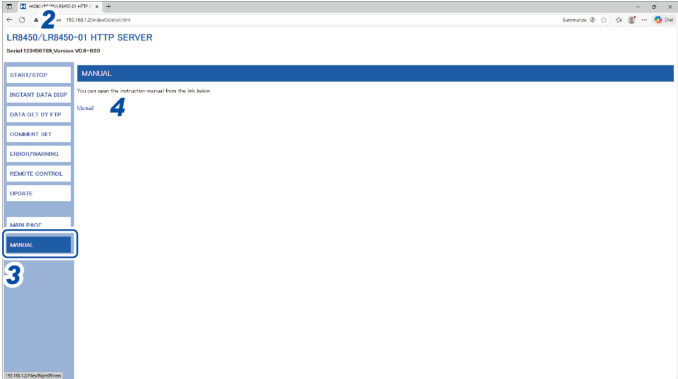
Enter the instrument’s address into the address bar (for example, ).
The instruction manual screen is displayed.
The PDF file of the instruction manual is displayed.