Setting Measurement Conditions
This section describes how to configure settings such as the recording interval and recording time.
Settings cannot be changed while measurement is in progress. Stop measurement and then change the settings.
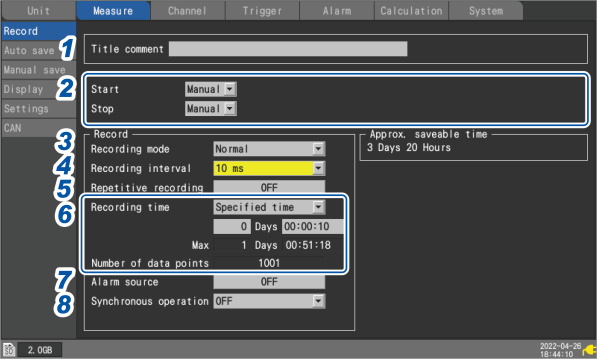
You can select the recording method.
| Continuous recording |

|
Sets the recording time setting to . Recording will continue until you press the key. Recording can be stopped with a trigger. |
| Time-specified recording |
|
Sets the recording time setting to . The setting indicates the amount of time for which to record (the recording length). Recording will stop once the set time has elapsed. Recording can be stopped before the set time elapses with the key or a trigger. |
| Repeat recording |
|
Sets the repeat recording setting to . Recording will resume after stopping (due to stop trigger conditions or the completion of recording for the set recording time). Recording will repeat until you press the key. If the repeat recording setting is , recording will stop after one iteration. |


“Title comments” in “1.8 Entering Comments” in the Instruction Manual.
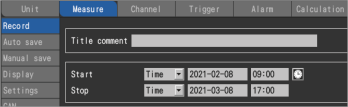
You can start measurement at the specified time and date. Once measurement has started, recording will start based on the trigger settings.
You can stop measurement at the specified time and date. Recording will stop when measurement stops.
Between the times measurement starts and stops, recording will start and stop based on the trigger conditions.
-
Measurement start: The instrument has started measurement and is waiting for a trigger.
-
Recording start: A trigger has occurred, and the instrument has started recording.
|
|
☑ |
Starts measurement based on the key or external I/O. |
|---|---|---|
|
|
Starts measurement at the specified time and date.
The instrument will transition to the waveform screen at key input and wait until the specified time and date to start measurement. If the specified time and date have already passed when the key is pressed, the instrument will start measurement immediately. |
|
|
|
☑ |
Stops measurement based on the key or external I/O. |
|
|
Stops measurement at the specified time and date.
Pressing the key during measurement will cause the instrument to stop measurement, even if a stop time has been set. |
|
☑ |
Data is recorded in synchronization with the internal clock. |
|---|
The setting cannot be changed from .
Example: Choosing will cause data to be captured at a 10 ms interval (100 times per second).
☑*1, *1, *1, , , , , , ,
, , , , , ,
, , , , , ,
- *1
Setting available only when using a module with data refresh intervals including 1 ms.
(when there is at least one U8553, U8554, U8556, LR8533, LR8534, or LR8536 module for which measurement is enabled).
The number of channels that can be used will be restricted based on the recording interval and auto save settings as well as whether any CAN Units are connected.
“Auto save (real-time save)” in “3.3 Saving Data” in the Instruction Manual.
|
☑ |
Stops recording after one iteration. |
|---|---|
|
|
Repeats recording operation. Measurement will stop when you press the key. |
|
|
Records for the set amount of time. (Max. 500 days) Days, hours, minutes, seconds |
|---|---|
|
☑ |
Recording will continue until you press the key. Measurement can also be stopped with a trigger. |
If you select , the maximum time and data count will be displayed. The maximum amount of time that you can record varies with the number of channels in use and the recording interval.
If you select , measurement will continue while deleting past data from the internal buffer memory if the maximum capacity of the internal buffer memory is exceeded. It is recommended to use auto saving since deleted data cannot be recovered.
“Auto save (real-time save)” in “3.3 Saving Data” in the Instruction Manual.
When using an alarm, you can save information about alarm source channels (channels that caused alarms).
|
☑ |
Does not save information about alarm source channels. |
|---|---|
|
|
Saves information about alarm source channels. Contents to be saved will differ depending on the data type. “11.8 Text Format” in the Instruction Manual. |
Configure the setting as necessary since saving the alarm source channel will cause the file size to increase.
Alarm source information cannot be saved for CAN channels.
Multiple instruments can be synchronized for measurement.
“8.3 Configuring Sync Input/Output (SYNC) Terminals” in the Instruction Manual.
One instrument can be assigned to serve as the primary instrument, and up to four instruments can be assigned to serve as secondary instruments.
The synchronization signal from the primary instrument is received by the secondary instrument, which then operates in synchronization with the primary instrument’s sampling clock.
|
☑ |
Do not perform synchronous operation. |
|---|---|
|
|
Uses this instrument as the primary instrument (one instrument only). |
|
|
Uses this instrument as a secondary instrument. |
When the recording time is set to and repeat recording is set to
Internal processing will take some time (downtime) between the time that recording stops after the specified amount of time has elapsed and the start of the next recording operation. Recording is not performed during this time.
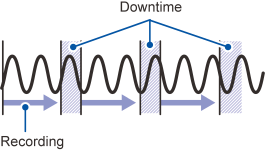
You can record without any downtime by setting the recording time to and enabling auto saving and file splitting. Saved data files can be segmented using the desired time segment.