Performing Numerical Calculations
There are two methods for performing numerical calculations:
-
Performing calculations during measurement (real-time automatic calculations)
Configure the desired numerical calculations and start measurement. Calculations will then be performed in real time during measurement.
You can review the most recent numerical calculation results on the waveform screen.
-
Performing calculations after measurement (manual calculations)
Use the instrument’s control keys to start the calculation after measurement has completed.
|
Performing calculations during measurement (Real-time automatic calculations) |
|
Performing calculations after measurement (Manual calculations) |
|
Numerical calculation settings are configured before starting measurement. Calculations are performed in real time during measurement.
|
Numerical calculation settings are configured, and calculations performed, after measurement. |
|
|
Numerical calculations after measurement (manual calculations) |
||
|
|
Measurement stop |
|
|
|
|
|
|
> screen |
> screen |
|
|
Under , set the function to and select the type of calculation. |
Under , set the function to and select the type of calculation. |
|
|
|
|
|
|
If you wish to save calculation results automatically |
|
|
|
> screen |
screen |
|
|
Enable auto saving. |
Perform calculations |
|
|
“Auto save (real-time save)” in “3.3 Saving Data” in the Instruction Manual. |
||
|
|
|
|
|
Start measurement |
|
|
|
|
|
|
|
Observe data |
Observe data |

In the following instances, calculated values and saved data are treated as described in “11.15 Data Handling” in the Instruction Manual.
-
When the waveform significantly exceeds the range’s measurement scope (+OVER, -OVER)
-
When the instrument detects a thermocouple wire break during temperature measurement (wire break detection)
If data acquired across the calculation target channel includes the points, which resulted from communications disruption or other reasons, the data will be exempted from the calculation target.
If data in the calculation range is occupied by the points, the string is displayed on the instrument’s screen, and the numerical calculation result will be saved.
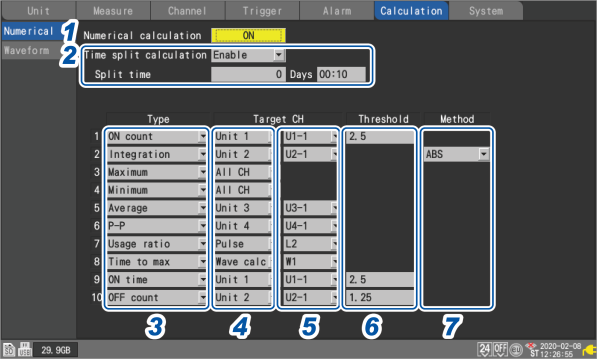
Configuring numerical calculations


☑,
|
☑ |
Performs the numerical calculation using all data acquired from the measurement start to the measurement stop, and then saves the calculation results. |
|---|---|
|
|
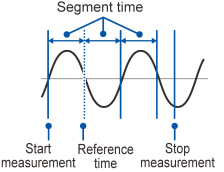
Segments the data set into those with a length of the set interval beginning from the measurement start*1, performs calculations using the segmented data sets, and saves the calculation results by interval basis.
|
|
|
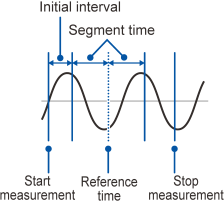
The first interval length will automatically be adjusted so that calculation values yielded at regular intervals () base on the are saved. (Only the first interval will become shorter than the .) |
If the or setting has been selected, calculation results will be saved for each time interval.
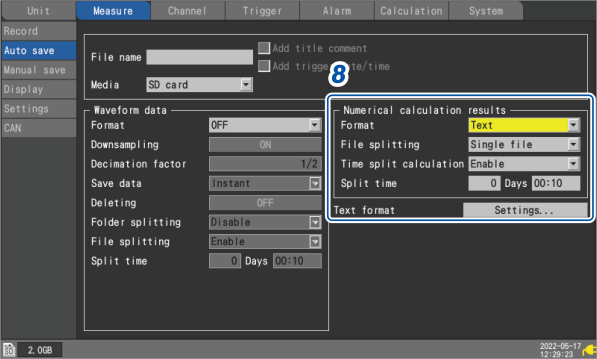
When the numerical calculation result type for the auto-save is set to , the setting is disabled.
“Auto save (real-time save)” in “3.3 Saving Data” in the Instruction Manual.
Set the format for numerical calculation results to .
(When is set to )
Under , set the time interval at which to perform the calculation.
days to days
For example, if the segment time is set to 10 min., the calculation will be performed, and the calculation results saved, every 10 min.
|
|
Calculation results will be saved at the specified intervals based on the reference time. The value 0 d 0 h 0 min. cannot be specified as the segment time. The value will be automatically changed to 0 d 0 h 1 min. |
(When is set to )
Under , set the time to use as the reference when segmenting files
Hour ( to ), min. ( to )
Under , set the interval at which to segment files.
, , , ☑, , , , , , , , , , ,
|
|
Calculation results will be saved at the specified interval starting at the reference time. The initial interval after the start of measurement will be automatically adjusted so that results are saved at the segment time as measured from the reference time. |
You can set up to 10 numerical calculations at the same time.
|
|
Calculates the average value. |
|---|---|
|
|
Calculates the difference between the minimum and maximum values (the peak-to-peak value). |
|
|
Calculates the maximum value. |
|
|
Calculates the minimum value. |
|
|
Calculates the time from the start of recording until the maximum value. *1 |
|
|
Calculates the time from the start of recording until the minimum value. *1 |
|
|
Calculates the integrated value. |
|
|
Calculates the integral value. |
|
|
Calculates the rate at which the measured value is greater than the threshold value. |
|
|
Calculates the total time for which the measured value is greater than the threshold value. |
|
|
Calculates the total time for which the measured value is less than the threshold value. |
|
|
Calculates the number of times the measured value crosses the threshold value in the rising direction. |
|
|
Calculates the number of times the measured value crosses the threshold value in the falling direction. |
- *1
Calculates the time from the trigger point when the trigger is used.
Only one threshold value can be set for each channel. If you specify the same channel for the ON and OFF time, the same threshold value will be used.
|
☑ |
Performs the numerical calculation using waveforms for all channels. Set the threshold value on the channel screen. |
|---|---|
|
|
Performs the numerical calculation using the waveform for the specified channel only. (n = 1, 2, ...) |
|
|
Performs the numerical calculation for a pulse waveform. (P1 to P8) |
|
|
Performs the numerical calculation using a waveform generated by a waveform calculation. (W1 to W30) |
Set the individual channel for which the calculation is to be performed.
Under , set the reference value.
“Value entry method” in “1.1 Performing Basic Operations” in the Instruction Manual.
Select the calculation method.
“Numerical calculation formulas” in “6.1 Performing Numerical Calculations” in the Instruction Manual.
|
☑ |
Calculates the difference between the integration or area enclosed by the zero position and the part of the signal waveform where its amplitude is positive and the integration or area enclosed by the zero position and the part of the signal waveform where its amplitude is negative. |
|---|---|
|
|
Calculates the integration or area enclosed by the zero position and the part of the signal waveform where its amplitude is positive. |
|
|
Calculates the integration or area enclosed by the zero position and the part of the signal waveform where its amplitude is negative. |
|
|
Calculates the integration or area enclosed by the zero position and the signal waveform. |


Real-time numerical calculations (automatic calculations)
This section describes how to perform numerical calculations while measurement is in progress.
It also describes how to review calculation results at a given point in time on the screen during measurement.
Configuring numerical calculations
Numerical calculations will be performed in real time.
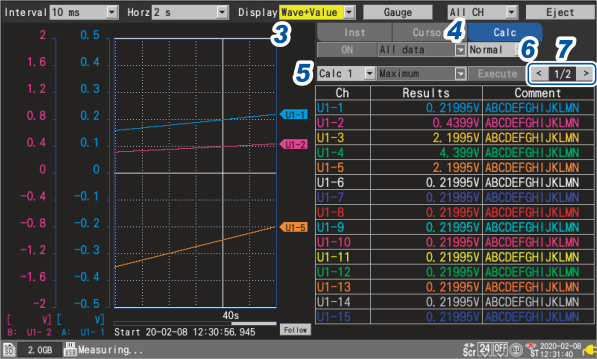
The numerical calculation results will be displayed, allowing you to review the calculation results at any given point in time.
You can select a numerical calculation of which you wish to display the result from among through .
|
☑ |
Displays the values calculated using data from the start of measurement. |
|---|---|
|
|
Displays the calculated values updated at regular intervals. |
When have been selected, the first segmented time (can be changed to the date or number of data points under ) will be displayed underneath the calculation results table.
You can change the channel for which to display calculation results.
Numerical calculations after measurement (manual calculations)
This section describes how to use the instrument’s control keys to perform numerical calculations after measurement.
You can review calculation results by displaying the screen and then setting the numerical display on the right side of the screen to .
Configuring numerical calculations
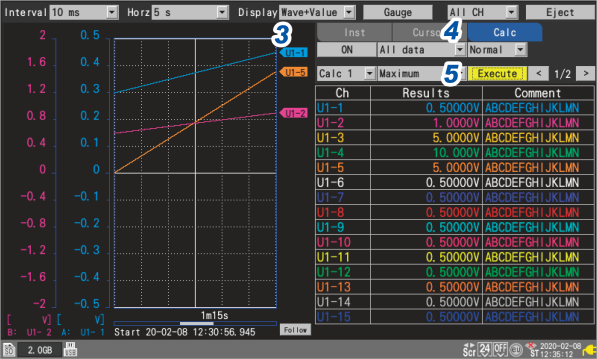
The numerical calculation’s settings will be displayed.
The numerical calculation set in step will be performed.
Numerical calculations can also be performed using waveforms that have been loaded from media (an SD Memory Card or a USB Drive). Once the waveform has been loaded, proceed to step above.
Time split calculation cannot be performed manually.
Partial numerical calculations
If performing manual calculations, you can specify the range over which to perform the calculation.
The numerical calculation will be performed after the range has been specified with the A/B cursors (vertical).
“Specifying a waveform range” in “1.14 Using the A/B Cursors” in the Instruction Manual.
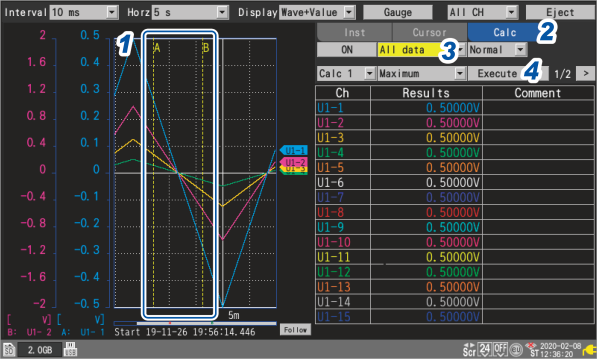
The numerical calculation’s settings will be displayed.
|
☑ |
Performs the calculation using the waveforms for the entire recorded length, without regard to the A/B cursors. |
|---|---|
|
|
Performs the calculation using the waveforms between the A and B cursors. |
|
|
Performs the calculation using the waveforms from the beginning to the A cursor. |
|
|
Performs the calculation using the waveforms from the beginning to the B cursor. |
|
|
Performs the calculation using the waveforms from the A cursor to the end. |
|
|
Performs the calculation using the waveforms from the B cursor to the end. |
The numerical calculation will be performed over the range specified in step .